Bloglovin' Facebook Pinterest E-Mail Instagram Shop Home About Us Freebies Shop Image Map

Friday, September 30, 2016

Keeping Up with Multiple Preps

The dreaded multiple prep. If you are lucky in the secondary world, you will only have 1 subject area to have to prepare for every day. However, there seems to be a whole lot of us that have 2+ preps that we teach. Having multiple preps can make it very difficult to get everything accomplished in a timely manner. A big part of this is just being ORGANIZED. If you are not organized, then something will inevitably slip though the cracks. Below are a few ways that I keep organized myself when having multiple preps.

One of the biggest for me is having everything typed up in a spreadsheet. It is not the full lesson plan, but a general overview so that I can thought process and remember what I need to do at a quick glance for each class. This helps me stay focused on where I am going as the day progresses. It also make changes a breeze. And, as cute as all of the lesson planners are out there, most do not give me enough space to thought process as fully as I could like. By having it digitally saved, then I can use as much room as I need. An example of what a day might look like with multiple preps is found below.


Another great way to stay organized is to keep a daily list of schedule changes or to-do's. This planner is from Blue Sky and it is hands-down my favorite. I can plan out what I need to accomplish for classes for each day as well as any schedule changes I need to be made aware of. This lets me focus a day at a time and not get completely overwhelmed with everything that needs to be accomplished before I leave on Friday.


Lastly, I keep a binder with my full lesson plans in it. As much as I love online lesson planning websites, there are times when I do not have the ability to look up each class to remember the small details within the 5 minute passing period. By printing each lesson plan out and having a copy at my fingertips by keeping them in a binder on my desk, I can be better prepared for each class in case an emergency arises. It also lets any administrator that walks in to quickly see what this class is doing today.


Do you have any strategies that help you stay organized with multiple preps? If so, please share them below so that others can find new ways to help out their own classroom.


Tuesday, September 27, 2016

Organizing Vocabulary Instruction

Organizing Vocabulary Instruction


Vocabulary lessons – where do you even start?  If you’re a new teacher, you’re probably already thinking of a long list of skills that you’ll need lessons and materials for.  If you’re an experienced teacher, maybe you have a big collection of resources, but the task of organizing them for a new year can still seem huge!   I think that’s because vocabulary covers so much ground, and so many details.  I know that I have arranged, and rearranged, my vocabulary lessons numerous times over the years!
                                                                                         

Just a few of the things you’re sure to be touching on at some time during the year –
·         The Basics – prefixes, suffixes, Greek and Latin roots.  This could be a full year of vocabulary lessons in itself!
·         Word Meanings – understanding specific meanings of words in their reading, and choosing vocabulary for their own writing – synonyms and antonyms, denotations and connotations, using context clues, understanding multiple meaning words, symbolism, and figurative language.  Another tall order!
·         Content Vocabulary – poetry terms, literary terms, and even terms related to vocabulary itself!
·         Story Vocabulary – interesting words from the stories and articles your class reads.


Some people have a strict order they follow to keep it all organized.  Others prefer to introduce vocabulary topics as they come across good stories to use as mentor texts.  I usually started with a few specific topics at first, probably prefixes and synonyms/antonyms.  Then things tended to get more flexible after that!


Wherever you decide to start, having students keep an organized vocabulary notebook can be a great help.  Students can set it up with sections for the various topics you want to cover, and then add to each section bit by bit as you add information and new words throughout the year.  In fact, I used this idea when revising my prefix, suffix, and root PowerPoints over the summer.  At the end of each presentation, I added a basic note sheet for students to complete as they viewed the slides, along with a completed sheet for students who need that.  Students can complete the note sheet for just the prefixes, suffixes, or roots that you are working on at the moment and glue it in their notebook to add to later.  Here is a picture of the note sheets and a few of the slides from my Suffixes 3 PowerPoint. 
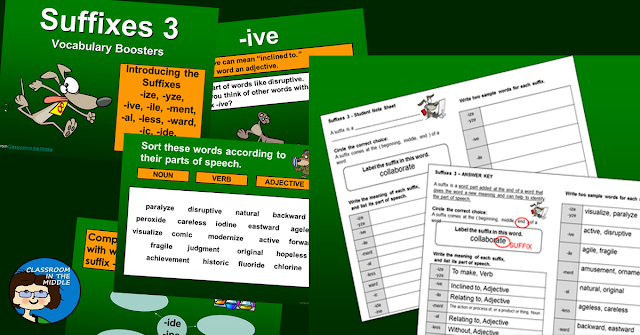

Suffixes PowerPoint with Student Notebook Page


Of course, mentor texts are great for introducing something new, and the great thing about vocabulary is that you can find examples for many of the topics – especially prefixes, suffixes, and roots – just about anywhere!  For more complex vocabulary topics, like connotations and denotations, there are still plenty of examples; it just takes a little more advance prep to find a good piece of text with several examples that you want to use.


Do you also keep a list of websites with good vocabulary activities for each topic?  Or maybe a Pinterest board for each?  If you do, be sure to include ReadWriteThink, a site where teachers contribute lessons and other resources.  You can search for a specific topic and narrow your search to either lesson plans or student interactives.  I searched for prefix lessons for 6th grade and found 3 complete lessons plus one student interactive.  My favorite was the game called Make-a-Word, which is played like the old fashioned card game, rummy.


What about some other vocabulary organizers?  Word lists?  A word wall?  Vocabulary cards?  Anchor charts?  Any or all of these will help keep things organized as you add more vocabulary rules, words, and examples during the year!


Why so much organization for this one topic of vocabulary?  Well, as strange as it may sound, I think it is so that you actually can remain pretty flexible throughout the year.  With basic organization in place, it frees you up a little bit to incorporate a new idea or a few new words whenever you come across them.  After discussing them in class, just add them in to one of your existing structures.


So, to me, these are the basics to have in place:
  • ·         Attractive anchor charts (or plans to create them with the class)
  • ·         Student notebooks, and a plan for how they should be organized
  • ·         Mini-lessons to introduce each new vocabulary topic
  • ·         Short practice activities to review individual skills as needed


But what do you think?  How flexible or how structured do you think vocabulary instruction should be for middle grade kids?  I would love to hear what works best in your classroom!


Pin to save for later:

Organizing Vocabulary Lessons


Blog post by Sharon from the Classroom in the Middle blog, where you’ll find more articles about teaching vocabulary and links to more vocabulary resources in my store, also called Classroom in the Middle.


Thursday, September 22, 2016

How I Organize Learning with Anchor Charts!


As a Middle School Teacher, who blogs at Mrs. Spangler in the Middle, I am happy to tell you that this year, I am a 6th grade Language Arts Teacher!  In my area of the country, Language Arts focuses on writing.  Sure, we read, but we use that reading as a springboard for our writing.  So, as you can imagine, there are all kinds of things for us to remember.  How do I help keep it all organized?  I use anchor charts and "anchor walls".


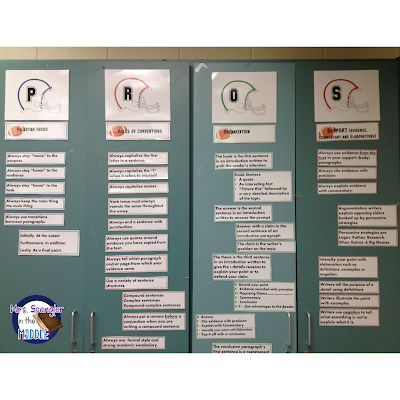
I use an "anchor wall" to visually organize all the skills students need to learn!

This is my embedded assessment "anchor wall" where for each class we broke down the end of unit essay test to its specific pieces and parts.  I had pre-printed all these skills on sticky notes.  Then, we ranked our knowledge level to determine what we really needed to focus on in order to be able to successfully write one of the four essays.  So on this wall, since all the skills in the unit are all laid out on sticky notes, as we learn we can move them!  This is great for showing growth as well as tracking our learning.


An "anchor wall" for Essays!


This is my anchor wall for the 4 parts that all essays must have (Polestar Focus, Rules of Conventions, Organization, and Support.)

As you can see, I used the doors for my cabinets to display my anchor information and I build it one piece at a time as we learn that piece in class.  Students love the idea of becoming writing "pros" and I love having a way to display the key concepts of writing that we have been learning!

For other related concepts, I use anchor charts - some of which we create together in class:  

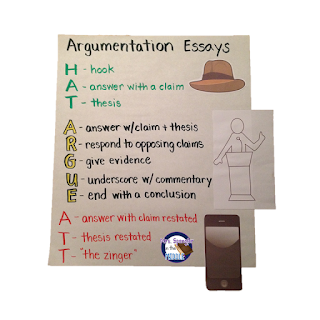
Informative Essay Anchor Chart with an easy to remember mnemonic for organization!Argumentative Essay Anchor Chart with an easy to remember mnemonic to help students learn the organization!  

I especially like these anchor charts because they give students a pattern to use as a foundation for their writing.   Naturally, I hand them near my PROS anchor wall.  Of course, I have other anchor charts for things like grammar and parts of speech.  I find that I use these instead of commercially bought posters most of the time!  Not to mention that they look great for Open House when I am talking about what we are learning and I can reference our charts and walls!

The best part is when the students look at them as we're working on something.  I love to see students use their tools!  And even though I have to cover them up during state testing, they will still look to where the charts are located as if they can somehow "see" them and remember.  

If you love anchor "walls" and charts as much as I do, then stop by and visit my Pinterest board for them:


How do you visually organize learning in your class?  Join in the conversation by commenting below.  

Thanks for stopping by!


Monday, September 19, 2016

Successful Classroom Systems for an Organized Classroom


Hi there! Shyra here from Junior High Core Values  A lot of times, we assume that routines and procedures are taught and mastered in the younger grades, but that’s not always the case. I always tell my sixth grade parents at Back to School Night that sixth grade is like “Kindergarten, the Sequel”.

Consistency and repetition are incredibly important at the beginning of the year in order to have a successful classroom system. Here are some systems that I use in my sixth grade classroom to make sure that we are maximizing every moment of learning time. 


Build a Classroom Community
A lot of this depends on how much freedom you have at your school site. However, it can be done. In my classroom we use three classroom norms: Attentive Listening, Mutual Respect, and the Right to Participate/Pass  Depending on the class, I may leave off that “pass” part. Throughout the year we participate in several team building activities to foster a sense of trust and community in the classroom. Since time is always in short supply, I try to bridge these in to whatever curriculum we are focusing on in the moment.

Stick to Routines.
It might sound boring, but for the most part, my students know exactly what to expect from the moment we enter the school building to the time that instruction begins.   Our end of day procedure is also the same from day to day. 

Nonverbal Cues
Nonverbal cues are the icing on my cupcake, the ice in my iced tea, and the chocolate to my difficult day.  My students use signs for asking a question, sharing a comment, asking for the bathroom, showing sympathy/agreement, and giving support. I, in turn, use signs for silence, for getting in line, for transitioning, for sitting, and for waiting. Establishing, practicing, and being consistent with classroom signs saves a LOT of time and makes the classroom run much more smoothly.

Student Buy In

One of my favorite ways of maintaining an organized classroom is to use a classroom economy. Hello, why didn't I start this at the BEGINNING of my teacher career?  Students are much more engaged and invested when they own their classroom...and it makes a lot less work for me! There are many ways to set this system up all over the internet. In fact, Mylie wrote about her system in detail just a few weeks ago.  In my classroom what works is having students apply for a job at the beginning of the trimester. They keep the same job for the entire grading period. Every student has a job, and every job has a salary that can be used for our monthly classroom auction. Now of course, there are going to be students who don't/can't remember your expectations. The way I handle that in my classroom economy is a Behavior Log. Entering your name in the behavior log (missing work, talking, not showing mutual respect, etc) is a $25 fine per infraction. The first two weeks of school this year there were over 25 entries in the log. Yikes! Last week, there were only five.   Now that's some improvement and organization! 

What are some systems you use in your classroom to make it smooth and organized? 


Friday, September 16, 2016

The Writing Process: What Students can Learn about Themselves

Student writers need to brainstorm, draft, revise, revise, revise some more, and proofread.  So how can your students keep their work organized in a way that also helps them reflect on their learning as writers?

Hello!  Marypat here from Just Add Students to introduce you to BGP.

Let's start with the problem...

I ask my students to save all graphic organizers, prewriting, drafts, and revisions for each writing assignment.  But there is usually more than one student who struggles with organization.

Papers always go missing, get stuffed into the wrong binder/folder/book/locker.  That student may end up starting a writing assignment several times -- trying to remember what had been written on the graphic organizers or in a draft.

The writing "process" was more of an exercise in starting over when students couldn't find prior work.

Then something wonderful happened...

I went to a workshop put on by my hero Nancie Atwell.  I am telling you - she is nothing short of amazing.  I learned so much from that workshop!  Here is one idea I used with great success. Something that helped all of my student writers, not just the disorganized ones.


Grab your stapler...

I had my students save, and staple, all of their work on a writing assignment together.  Most current work on top.  This was what my students referred to as the "big, gigantic pile."   The BGP.

As my students write, I collect and review all of the steps of a draft (that's how I sort and set up mini lessons for the next day).  As we work through graphic organizers, intro paragraphs, thesis builders, drafts (D1, D2), revision activities, peer reviews, proofreading and then finally the published piece, the "big, gigantic pile" grows.  Always with the most current work stapled on top.

What the student ends up with is a "big, gigantic pile" of work stapled, marked up, and dog-eared.  On the very top, they add their published piece (usually not stapled so it can easily go into their portfolio or on the wall).

And the result...

Several really great things happened when I started implementing the BGP:

1.  Work was less likely to get lost.  All the pages were kept together and kept in writing folders. 

2.  Students were impressed at how much writing they had done!  I heard students say things like, "Wow, I did a lot of work on this!" and "Look at how bad my first draft is!"  and "My ideas really changed as I worked on this!"  

Students were thinking about, reflecting on, and rejoicing in their writing!  They could see that their writing was, indeed, a process.  (Insert happy dance here!!)

3.  Student self-assessments.  Before my students turn in an assignment, I always ask that they complete a simple self-assessment.  It consists of three questions:  
  • What was easy about this assignment?
  • What was difficult about this assignment?
  • What would you like me to know?
I ask students to flip through their stapled pile and consider what they've been working on, thinking about, struggling and succeeding with over the last few weeks.  This gives them a chance to really consider how the writing process worked for them.  Plus, it helps build goodwill that they know I care about their experience with this writing assignment.

4.  My grading got easier.  Yes.  You read that right.  Easier.  Because I reviewed each graphic organizer, thesis, intro, and draft as we worked on it, I knew what students were writing about.  I could quickly see where they were going off the tracks.  My comments gave them direction for the following writers' workshop task.

When I received the final product to assess, I could look through their "big, gigantic piles" already familiar with the topics, direction, and difficulties they had.  I could see where students worked on my suggestions and where they chose to ignore those suggestions (time for a conference!).

Usually, I had very little to write on the published text.  I'd already addressed issues in the prior drafts.  And because I always use a rubric and the students received that when the assignment was given, I could quickly assess their writing on the criteria of the rubric.

I love trees...

I do, I really do!  And I often think about how wonderful a paperless classroom would be.  However, when teaching middle school students writing, there is a HUGE payoff when they can actually see the writing process.  Specifically their own writing process from start to finish.

When I experimented with paperless writing, my students lost the ability to step back and look at their own writing process -- from where they started to where they ended up.  

Even if you give the BGP a try for one assignment, your students will benefit.  It can be used for any writing project -- in any subject.  But most importantly, it will help your students think about themselves as true writers.