Bloglovin' Facebook Pinterest E-Mail Instagram Shop Home About Us Freebies Shop Image Map

Wednesday, August 31, 2016

Building Appropriate Relationships in the Middle School Classroom


Every school and every district is different in their desire for you to relationship-build with your students.  While some stress the importance of relationships and even provide Professional Development to teach you how to care, others will discourage relationships altogether.  Considering the recent press about the idiots that just happen to be in our profession, we do have to be cautious in the communications we make in our classrooms.  We have to be clear about our intentions, and we must know our boundaries.  
Building Appropriate Relationships in the Middle School Classroom
  At one district orientation for new teachers, the superintendent took the stage to warn his new teachers about a great threat among us…Facebook.  He went on to discuss how teacher’s careers could be ruined if they used this site or if any derogatory information were posted there against them, whether it was posted by the teacher or not.

At another district, I was smothered with the demand that I form relationships with ALL of my students and reach them in any way possible.  Home visits, attending every event, making calls home on a weekly basis.  This was too much.  It just scared me!  After all, when it comes to making relationships with anyone, and my need for personal space, I prefer moderation.  It can be done, but it must be learned.

Teaching at each level opens the door for different communications with your students.  Let me give you some examples… I do not given out my phone number, my home email, or my home address.  I teach kids that would not use them, even if they had them.  I have, however, built strong, professional relationships with many of my students, and have my own form of communication with each that works.
One student had gone through so many life struggles.  Too much for a 12 year old.  And, despite my demanding style with my classes, and often harsh criticism of my students to get their attention for learning, it is I that she chose as her “go to” person.  We wrote notes.  School policy is to take notes away, read them, and then pass them onto the administration, but for me, it was far more effective to write on them and pass them back.  With this particular student, it started with an attitude marching into my room on test day.  She wasn’t ready for the test, and I wasn’t willing to post-pone it for her convenience.  She sat, the test blank in front of her, with a smirk across her face.  After 5 minutes passed, I wrote on a tiny post-it note, “You should get started.”  She wrote back that she didn’t study and wasn’t prepared for the test.  After many more post-its, and a few quiet tears that streamed down her cheeks, she picked up her test and did the best she could under the circumstances.  From that day on, through many traumatic home events, we wrote notes to get the words out and find a solution.
With students at another school, the communication and the relationships were far different.  These were all identified gifted and talented students in an advanced curriculum middle school program.  On the first day of school, I introduced myself and set up the boundaries.  Knowing the conscientious work of these students, I knew they would not be able to sleep at night if they had homework questions unanswered.  I agreed to keep my school email account open at home, up to 9 p.m. to answer questions or concerns, especially on big homework nights.  On leaving the school, I gave my new email to those I worked with most often, and made the offer to always help them on their homework if they needed it, even though I was no longer there…and, still, to this day, I receive emails from those students (and others) asking for college or career advice, and sometimes help with other life lessons.  From miles away, I can still give homework advice and they can get busy working instead of feeling frustrated. 
To me, it’s worth it.  It’s my job; I am a teacher.

Building Appropriate Relationships in the Middle School Classroom

However, it's important to keep clear boundaries and set them early on in the school year.  Know what your students need and know your district policies.  

Want Ideas?
Building Appropriate Relationships in the Middle School Classroom

Here are a few old school suggestions for building great relationships:
  1. Write! Write! Write!  Write notes everywhere.  Leave comments on their assignments, send them quick emails to check on progress, and use a dry erase marker on their desks to welcome them to class.
  2. Make early contact.  Email, call or use snail mail to make contact with your students (and their parents) early in the school year (or before).  If your first communications are positive, you will be a greater trust from all parties.
  3. Be frequent and sincere with interest or concern.  Meet every students at the door every day. Read their faces and ask questions about their day, their extra-curricular activities, and even their personal interests.
  4. Praise when it is deserved.  Do not be sappy with your praise; instead create value and appreciation for a job well done.  
  5. Listen and learn.  Survey your students on a regular basis.  Use the feedback they give you about content or your teaching methods to adapt to their learning styles and interests.  
Most importantly, be there! Through consistency in your classroom behavior, your daily lessons, and your high expectations, students will learn that you care and that you will be there if they need you.  Those are the relationships you want to build in the middle school classroom!


Sunday, August 28, 2016

College Pennant Activity for Back to School


We've shared this activity in the past with you, but we think it's such a great back to school activity, that we wanted to share it again! This is a fun and really easy way to create a collegiate environment in your middle school classroom. Our students loved doing this activity, and these pennants made for great classroom decor as well!

Using this College Pennant Activity (which you can download for FREE from our Teachers Pay Teachers store), we had our students design a pennant for their dream college. Then, on the back of the pennant, they had to include their dream job and three steps they could take right now to make that dream a closer reality. It was a really fun project and the kids came up with fantastic pennants for us to hang up!


That's it! A very easy, fun, creative, and engaging way to build community and hard work ethic in your classroom! We hope you enjoy using this activity with your students as much as we did :)


A fun back to school activity for your middle school or high school students! Help build classroom community and work ethic in your classroom!


Friday, August 26, 2016

Setting Up a Middle School Classroom Economy

Last school year, I had very ambitious dreams about starting a classroom economy system in my room. I was desperate for a way to tie in the Personal Financial Literacy TEKS that are a part of our math standards in Texas. I was very nervous about starting one and it was a very large project to take on to ensure it fit my very own needs. I am going to give you an idea of how I set mine up so that you can easily copy for your own room. If you want to know my full-year review of the classroom economy, be sure to stay to the end.
I think the single hardest part was trying to figure out how to keep my money organized. I ended up getting this container from Dollar Tree and inserted index card dividers I already had lying around. This turned out to be perfect! I never had to guess or hunt for certain bills because they were already organized ahead of time.
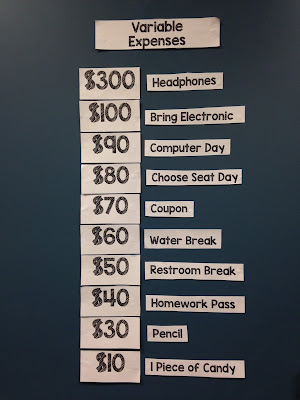
This was the fun part. I let students buy things under the variable expense category using the money they had earned. If you notice, I also included restroom breaks and pencils. No more freebies! This allowed me to have students use their credit cards in emergency situations and learn about paying them off with interest. It also kept them from taking all of my pencils before they had even asked peers to borrow one. The kids took this very seriously because they wanted to spend their money on fun stuff, not pencils. For the first time in my entire career, I actually had pencils left over at the end of the year!! I had always run through around 500 by spring break before the classroom economy system!!
Fixed expenses were the not-so-fun part. And yes, I really did make my students pay rent. However, I did lower it down by a lot because the amount shown here was overly ambitious and the students were not reaching it. We changed rent to $100 after the first month equating $25 per week. This mean on months like December that were shorter, I only charged them the $25/week for however many weeks we were in school that month. If students could not pay rent, then they were required to bring their lunch into my room and clean my desks after they had eaten as a way to "work for hire" at $25/lunch break. So if a student was roughly $50 short on rent, they owned me 2 lunches as "work for hire." Almost all of my student figure out real quick to budget better and save up for rent before spending their money on the variable expenses!
The income was how students earned their money. You can tailor this to meet the needs of your classroom and what you would like the students to accomplish. The key with an economy system is to have some things that are predictable and all students can reach like being in your seat and working on the warm-up by the time the bell rings. Some are there for students to stretch themselves such as making an A on an assignment. It also needs some sort of teacher discretion where the teacher can give someone money just because they feel like it for going above and beyond on an assignment, helping a peer without being asked, etc. Teacher discretions are not meant to be given every single time, but randomly, so that students never get too complacent on their work.
Here is what the prices looked like set up in my classroom. It was very easy to see and reference for both the students and myself.

So now the part you are waiting for...how did it go? I truly felt like it was single-handedly the best idea I ever had. The students were completely committed to it till the very end. One of the major benefits was that it provided me with an easy way to give lots of positive reinforcement without much effort. My class behaviors also became almost non-existent. Students who misbehaved in other classes were angels in mine because they were so committed to working hard and earning money. I only had to send 1 student to the office the entire year (he went a lot, but he was the only one who wouldn't fully buy-in to the system). This is in stark contrast to the 5-6 I had to send the year before.

I also felt that it gave students lots of real-world application. It was common to hear "I hate paying rent! Being an adult sucks!" Many of my students come from families who are not good with budgeting themselves, so this was a new world for them. Yet, I feel confident that they gained some budgeting skills while with me this past year.

It also taught my students how to count money. So few of them are ever exposed to cash anymore since their families just use debit and credit cards, that they have no idea what to do with actual money. Teaching them how to count the bills from biggest to smallest was not an area I expected to have to teach going into this, but I was very excited to see them accomplish this by the end of the year. I may not directly tie to a standard, but at least the can handle money now.
If you are thinking about starting a classroom economy in your room this year or the next, be sure to check out my starter kit here. It has everything you need to get started and begin to tailor it to your own classroom needs. It has quickly become one of my best sellers for good reason. Have a fantastic school year!


Wednesday, August 24, 2016

Flexible Seating in Middle School


Hi everyone, its Julia from History from the Middle and I'm going to share with you how I do Flexible Seating in my class--YES, my middle school class!  It works!!  I'm going to share with you how I have set up my class, how I share it with my students, and some images of what it looks like in my class!

I start with flexible seating on day 1...Which was actually today!  I first label each of my seats with a table number and a seat number.  I print these out on sticker sheets and place on each desk and then I also print the seat labels on paper to make "seat cards".  These are what I actually use to randomly assign seats at the beginning of the year.


So, on day 1, I lined my students up outside my class, briefly explained that our class has flexible seating, and we would discuss what that is over the next few days, but that today they would just be randomly assigned a seat.  I started with my floor seats first and asked who wanted to sit there, and then randomly handed out the other cards for my other seats.

I have the following options in my class:  Floor seating with stadium seats and an Ikea Coffee Table, 3 low tables with Ikea Stools, 1 lower table with crate seats, multiple desks and chair and then 1 table with Ikea Rolling Chairs.  I am planning on upgrading one of my stool tables with the ALL popular Kore Wobble Stools!  They are a bit pricey, but I think my students will really enjoy having them as one of our choices!  All are part of my flexible seating with the exception of my table with my Ikea Rolling Chairs I'm using as a VIP table this year!  Here is an interesting blog post on VIP Tables!


Ikea Coffee Table with Stadium Seating (I store the seats on the shelf under the table)

Low tables with Ikea stools

Low table with crate seats


Regular desks and chairs


Table with Ikea Rolling Chairs (VIP Table)

I also have two areas in the back of my room that I open up for independent activity time.  One area is my classroom library with 4 bean bags (that I got for a GREAT deal from Craigslist!), the other is an area with some more crate seats and 2 small Ikea Tables.  

Library area with bean bags

Crate seat area with Ikea Side Tables

After day 1 of introducing, I then go into the details of how Flexible Seating will work in our class.  Click HERE to see my Power Point on Flexible Seating that I share with my students!  On the last page of the presentation, I have hyperlinked for your a Google Forms survey that I created to survey the kids on what seating style they like best!  Feel free to copy to your Google Drive and us!  Also, if you're looking for some pre made rules and posters, check these out from Buckeye Teacher!

 Each day, I switch up the seating cards before they come in so they have the opportunity to sit in a different seat.  Once I feel they are comfortable with the seats AND knowledgeable of my rules and expectations with the seats, I then allow them to freely choose.  I initially have them choose a Home Seat which will then be written on a seating chart.  They know that when there is a sub, they will sit in that Home Seat so the sub is able to follow with a seating charts.  

When I first entered the "unchartered waters" of Flexible Seating, I was worried about it not working and not being able to manage it.  I can tell you through reading many other blog posts and just seeing what worked in my own class with my students, I've seen great success!  In fact, it is has now spread to several other classrooms at my school! 

I'd love to hear from other teachers that have either tried ir or are thinking about trying it...Please share below!


Tuesday, August 23, 2016

How I Get My Ducks In A Row With Classroom Routines!


Routines create a pattern that students can count on so they knew what to expect which helps to create stability and a positive classroom environment.


Ok, I'll admit it.  I love routines.  Why?  I think it's because they create stability and order.  And when you teach Middle School, that can be hard to come by.  After all, many of the students are characterized as "hormones with feet" and with their changing bodies and changing perceptions, their sense of security is definitely diminished.

So here is an opportunity for me to create a space where calm amidst the chaos can prevail.  Take, for example, my specific entering routine:

1.  I greet students at the door.
2.  Students pick up their materials.
3.  The bell rings and I play an inspiring song in the background.
4.  Students write in their planners and then begin the bell work.  (I take attendance.)
5.  I come around and initial planners and answer questions.
6.  The song ends and I announce that there are X number of minutes to complete the bell work.
7.  I come to the front of the room and welcome everyone.  Then we review the learning target and homework due date.
8.  Now we go over the bell ringer.


Believe it or not, this entire procedure takes only about 8 - 10 minutes once we get into the routine.  But you can see that for me, bell ringers are a necessary part of getting everyone in and settled.

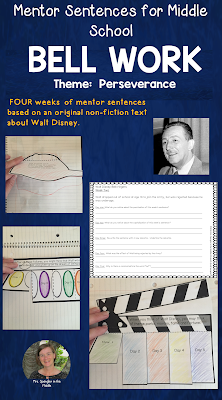
I generally use bell ringers as an opportunity to review and practice.  If you use bell work for this too, then you might be interested in these Middle School Mentor Sentences that are all ready to go and focused on perseverance using an original text about Walt Disney.

Here's a Month of perseverance themed bellringers all based on an original non-fiction text about Walt Disney. Supporting growth mindset, the topic of perseverance is perfect for the beginning of the year!
This is 28% off today if you use code OneDay!

It takes several days to completely teach a routine like this, but I think Bell Ringers are essential to creating a classroom community.  Why?  They become part of a routine that satisfies a need for safety that comes from order.  

So, how do I do this?
A little bit at a time.
Last week, I modeled coming into the room with my own book bag and materials.  I actually pretended to be a student and even sat at a student desk.  The kids chuckled, but instead of me just explaining it, I showed it to them.  Then, the students practiced.  
They practiced the routine, you ask?  Yes!  This is how we all learn, right?  This applies to routines too!  After we have the coming in part down, then we add in planners.  Once the students can come in and write in their planners, then we add in the bell work.  One step at a time - I think I can, I think I can.  :)

Now here's my full disclosure:  I've been doing this for 22 years.  So I know how this will turn out.  Entering the class using this routine will become a habit.  So much so that when there is a new student, they confidently show it to that student - or an administrator - or anyone who asks.  They are confident because they know they can depend on it.  And in a world where change is the norm, it's nice to have a little bit of predictability in one's life.

Do you have routines in your classroom?  Join in the conversation in the comments below!


Friday, August 19, 2016

Yikes! I Need a Sub! 10 Essentials for your Sub Plan

Choose the "best" answer

1.  You've been up all night
     A.  battling a stomach bug
     B.  comforting a sick child
     C.  petting a neurotic dog during a thunderstorm
     D.  talking your sister down from her latest break up
     E.  all of the above

Yup.  You're gonna need a sub.  Should be easy.  Should be a no-brainer.  But it never is!  How many teachers have you heard say, "It's easier to come to school sick than to plan for a sub"?

Put Down the Glitter Glue

Why is it always so much fun to do anything else besides creating sub plans. You've probably seen the cute "Sub Tubs" on Pinterest.  Am I the only one who would rather decorate the sub tub rather than fill it? 

But this is the time of year to create, plan, amass and finally conquer your sub plans!  You will be so, so happy in a few months when you need them.  But where to get started?

The Essentials for Sub Plans

1.  Make it easy.  Anyone who has had to rely on a long-term sub will tell you that the primary goal of having a sub is keeping her happy!!  It is wonderful to have a sub who loves to teach your classes.  Make your sub's job easier.  
  • Provide crystal clear directions.  Your sub may not be an experienced teacher.  Keep that in mind.
  • Make sure you provide the sub with everything he or she will need.  Make all the copies, have the teacher key, provide directions for teaching.
  • Have your class schedule, class lists, and seating chart clearly labled and available.
  • Put all your sub stuff in a binder or folder (or hey, go ahead and make a cute sub tub of your own!).  Make sure it is easy to find.  
2.  Make it clear.  What do you want the sub to do?  Your sub probably won't be able to follow your lesson plans.  Especially if they are as cryptic as mine are!

But if you do want your sub to continue with your plans (an you have time to plan ahead), try "blowing them up." I do this by breaking them down step by step.  I don't include objectives, but I make it clear by using a numbered list.  

If you're in love with checklists like I am (you can read my post about how I use them), provide a checklist next to your plans so the sub can mark what is and isn't completed.  Or use this "What Happened Today" chart. Find it here for free:  "What Happened Today" note from the Sub
Freebie available on my TPT store!


3.  Make it meaningful.    There's a good chance that you don't want your sub to try to continue with the lessons you are currently working on.  If that's the case, consider:  
  • using "evergreen" content that your students need extra practice with.  This is an ideal time for them to get in some extra practice using quotation marks, capitalization, or using sentence variety.  The beauty of evergreen content is that it can be used all year -- it's not seasonal.  
  • digging around in the supplemental materials that your textbook provides.  
  • scouring that bookshelf full of resources. 
  • pulling out those task cards! 
  • putting those learning games in your closet to use.
  • rejecting "busy work"!
4.  Make it count.  If you tie the work the students are completing to an assessment, will they work harder on it? This is the ultimate, "if a tree falls in the woods and no one is there, does it make a sound" question!  

Do collect and assess what students do with the sub.  Value the sub and students' work.

5.  Use the clock.  Help your sub by providing a timeline.  Again, if your sub isn't a seasoned teacher, he or she may have no idea how much time students should devote to different activities.  Provide an estimate.  For example, how long should the sub allot for journaling, independent reading, or group work?

6.  Change it up.  You probably have your students moving around during class.  They may move in and out of small groups, work with a partner, or turn and talk.  Be sure to include that in your sub plans.  Your students do not have to work in "monk-like silence" (a phrase a fellow teacher likes to use!) when you aren't at school.  If your sub will be following your plans, be sure to build in opportunities for students to talk.  

7.  Plan ahead.  One year, the administration wanted teachers to have two weeks of emergency plans. Whoa!  That was a bit much, but once I created those plans, I reused them for several years!  I don't know if you need two weeks of plans, but having at least one week will give you peace of mind.  

8.  Establishing Routines Helps Everyone.  Your sub will love you forever if you train your students.  How do you quiet your class?  What do students do when they first walk into your class?  How do you dismiss?  Collect papers?  Be sure to let your sub know the routines that you've taught your students. 

I don't know why students feel like they get a free pass to do anything they want when a sub walks in the door, but having firm routines will help.  

9.  No study halls, please!  A sub's job is difficult enough.  You know how hard monitoring study hall can be.  Sure, some kids will love it, but for others, it is play time.  Respect the sub (and your students!) enough to provide meaningful work for the students.

10.  Want more bells and whistles?  My friend tucks a Starbucks gift card into her sub plans as a little extra way to say "thank you."  We all know how difficult the job of a sub can be; there are tons of ideas for adding a special treat for a sub, but making sure you say "thank you" will go a long way!

Get 'er Done!  

Carve out a bit of time soon to put together your sub plans. Remember that the ultimate goal is to make your time away from the classroom restful and less stressful!  Knowing that your class will be taken care of while you're gone will be the best medicine of all!  

Here's to a healthy school year!

Happiness always♥


Thursday, August 18, 2016

Student Learning Inventories

Mandy from Caffeine and Lesson Plans here, excited to share with you a little tidbit about student learning inventories- one of my absolute favorite back to school activities!

As a teacher, I have always struggled to maximize the limited time I have with my students. No matter how much time I get, I always feel like I could use more! There is just so much learning to do, and so little time to do it in. One of the best ways I have found to get the most out of my instructional time is to really try to tailor the teaching to my students in every way possible. Yes, it's true that I can't change the curriculum... no matter how much I want to at times. However, I can modify my instruction to include different styles, activities, and assessment to best suit their needs. How can I found out what their needs are? Student learning inventories!

The learning inventory is a short questionnaire designed to help teachers identify the learning style of their students. It's a simple "check the box" type of assessment which is pretty quick to administer. There are about a million versions out there to try, based upon the grade level you teach and if you have technology available to you or not. Here are a few favorites of mine:

Multiple Intelligences Survey (available printable or as a self-calculating excel document)
Mathematical Learning Inventory (printable) *one of my favorites!!

To be honest, most years I pick and choose questions from each of the available tests and create something that I think will appeal to my kiddos the most. Definitely make it your own!

Once we finish assessing ourselves, I have the students determine their learning style based upon the answers they gave. The directions are included in each of the linked inventories. Then, I give the students a short presentation on what it means to be each learning style and what they can do to learn best. Here is an overview of what I use with my kiddos, compiled from several websites:

Visual Learners:
  • use visual materials such as pictures, charts, maps, graphs, etc.
  • have a clear view of your teachers when they are speaking so you can see their body language and facial expression
  • use color to highlight important points in text
  • take notes or ask your teacher to provide handouts
  • illustrate your ideas as a picture or brainstorming bubble before writing them down
  • write a story and illustrate it
  • use multi-media (e.g. computers, videos, and filmstrips)
  • study in a quiet place away from verbal disturbances
  • read illustrated books
  • visualize information as a picture to aid memorization
Auditory Learners:
  • participate in class discussions/debates
  • make speeches and presentations
  • use a tape recorder during lectures instead of taking notes
  • read text out aloud
  • create musical jingles to aid memorization
  • create mnemonics to aid memorization
  • discuss your ideas verbally
  • dictate to someone while they write down your thoughts
  • use verbal analogies, and story telling to demonstrate your point
Kinesthetic Learners
  • take frequent study breaks
  • move around to learn new things (e.g. read while on an exercise bike, mold a piece of clay to learn a new concept)
  • work at a standing position
  • chew gum while studying
  • use bright colors to highlight reading material
  • dress up your work space with posters
  • if you wish, listen to music while you study
  • skim through reading material to get a rough idea what it is about before settling down to read it in detail.
As a teacher, I use this info to help guide me through lesson planning. Of course, I can't meet every student's individual learning style every lesson, but understanding where my kids are at helps me break down my planning and tailor as many lessons as I can to as many kiddos as I can.

So, there it is- one of most informative and useful back to school activities!